Old photographs, despite the speckle, grain, and abrasions, have a unique charm, don’t they? It is this charm of the past that we often wish to reproduce in our photos. It is not difficult: You only have to have minimum skills with the Photoshop graphic editor.
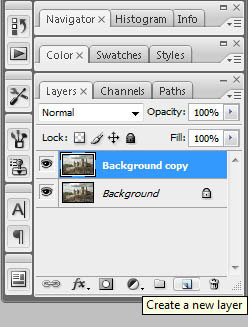
 First, open a photograph in Photoshop. For the sake of convenience, we will duplicate our layer. To do so, in the layers panel, drag the working layer to the Create New Layer icon.
 Let’s start with making the picture monochrome. We can make the photo black and white, but we will recreate sepia effect, since a brownish image feels warmer, and looks more like old photograph. To do this, in the Layers palette, double click on the icon with the image of our working layer. This opens the “Layer Style” window, where you have to select the “Style” tab and then click on “Sepia Tone,” and the photo will become sepia-colored.
 To make it easier for us to work with layers, let us combine image layers by pressing the Ctrl+Shift+E keyboard shortcut, then duplicate the layer again, same as at the beginning. Now, let’s try to imitate an old daguerreotype; make our photo slightly blurred, soft, as if it were illuminated from the inside. To do so, click on the “Filter” tab, select “Blur,” followed by “Gaussian Blur.”
 A window will open where you can select appropriate settings, and the picture should become rather blurred.
 Now go to the “Image – Mode” menu, and instead of RGB Color, check the box next to “Lab Color.” In the warnings window, select “Don’t flatten” (without merging layers).
 After these manipulations, go to the “Image” menu item again, but this time select “Apply Image.” In the opened window, select “Overlay” blending mode from the drop down menu, and click OK. Then, go in the Image menu again and in selecting Mode, change it back to “RGB Color.”In the pop up window, click “Don’t flatten,” again.
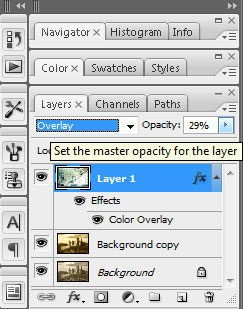
 Now, we have to adjust opacity of the layer. To do so, find the “Opacity” item in the “Layers” palette, and select the desired value using the slider.
 You can set the value up to your own intuition and aesthetics. To make the photo look even more like an old photograph, let us add the “Wear Effects.” To do this, we will start by taking an image of an old, worn surface (it is easy to find on the Internet).
 Now, let’s open it in Photoshop, and press combinations Ctrl + A (select all) and Ctrl + C (copy). After that, switch to the picture we’re working with, and press Ctrl+V (insert); the picture with the background will be added to our image as a new layer. Now, you have to press the Ctrl+T key combination, and using the mouse, adjust the size of the background to the size of the image.
 Now we have to work a little with this new layer. Make sure that in the “Layers” panel, the layer with the image that will be used as the texture, is active, and double-click the icon of the layer and change the layer color into sepia, the way we did at the beginning.
 Now, in the “Layers” panel, select the “Create New Fill” or “Adjustment Layer icon,” then select “Levels.” A window will open, and you’ll have to pull the two extreme sliders closer to the center. The background will now become more contrast; dark tones became darker, and light tones became lighter. Click on the icon of the top layer and select “Merge down” to merge the top correcting layer and the layer with the texture together. Now, in the “Layers” panel, you need to select the blending mode “Overlay,” and reduce layer opacity using the “Opacity” slider.
 If you are satisfied with the result, press Ctrl+Shift+E (merge all layers), and save the image.


